**Jagged Alliance 3 Modding**
!!! WARNING
Mods are player created software packages that modify your game experience. USE THEM AT YOUR OWN RISK! We do not examine, monitor, support or guarantee this user created content. Downloading and playing with Mods via the Steam Workshop is subject to the Steam Subscriber Agreement.
# Overview
*Jagged Alliance 3* Mods are packages of *ModItem* definitions. A *ModItem* changes a single aspect of the game and can have associated code or assets - textures, models, sounds, etc. A full list of the available *ModItems* can be found below.
Mods are created using the in-game *Mod Editor* and are stored locally as folders in `%AppData%/Roaming/Jagged Alliance 3`.
Mods can be uploaded to *Steam Workshop* via the *Mod Editor* which makes them available to the player community.
If a mod is available both locally and via subscription on *Steam Workshop*, the local version overrides the version from *Steam Workshop*.
Art assets are authored separately in content creation tools e.g. Blender and imported into the Mod.
Feel free to engage in discussions about modding, the game, or simply chat with fellow community members through the official channels.
# Mod Editor
The *Mod Editor* is a companion application launched by the *Jagged Alliance 3* game. It is only used to display and edit the mods and the ModItem items.
!!! WARNING
All mod loading, saving, uploading to Steam Workshop and testing of the mod content is done by the main game itself - if you close the main game without saving, the *Mod Editor* will also close and you will lose all unsaved changes.
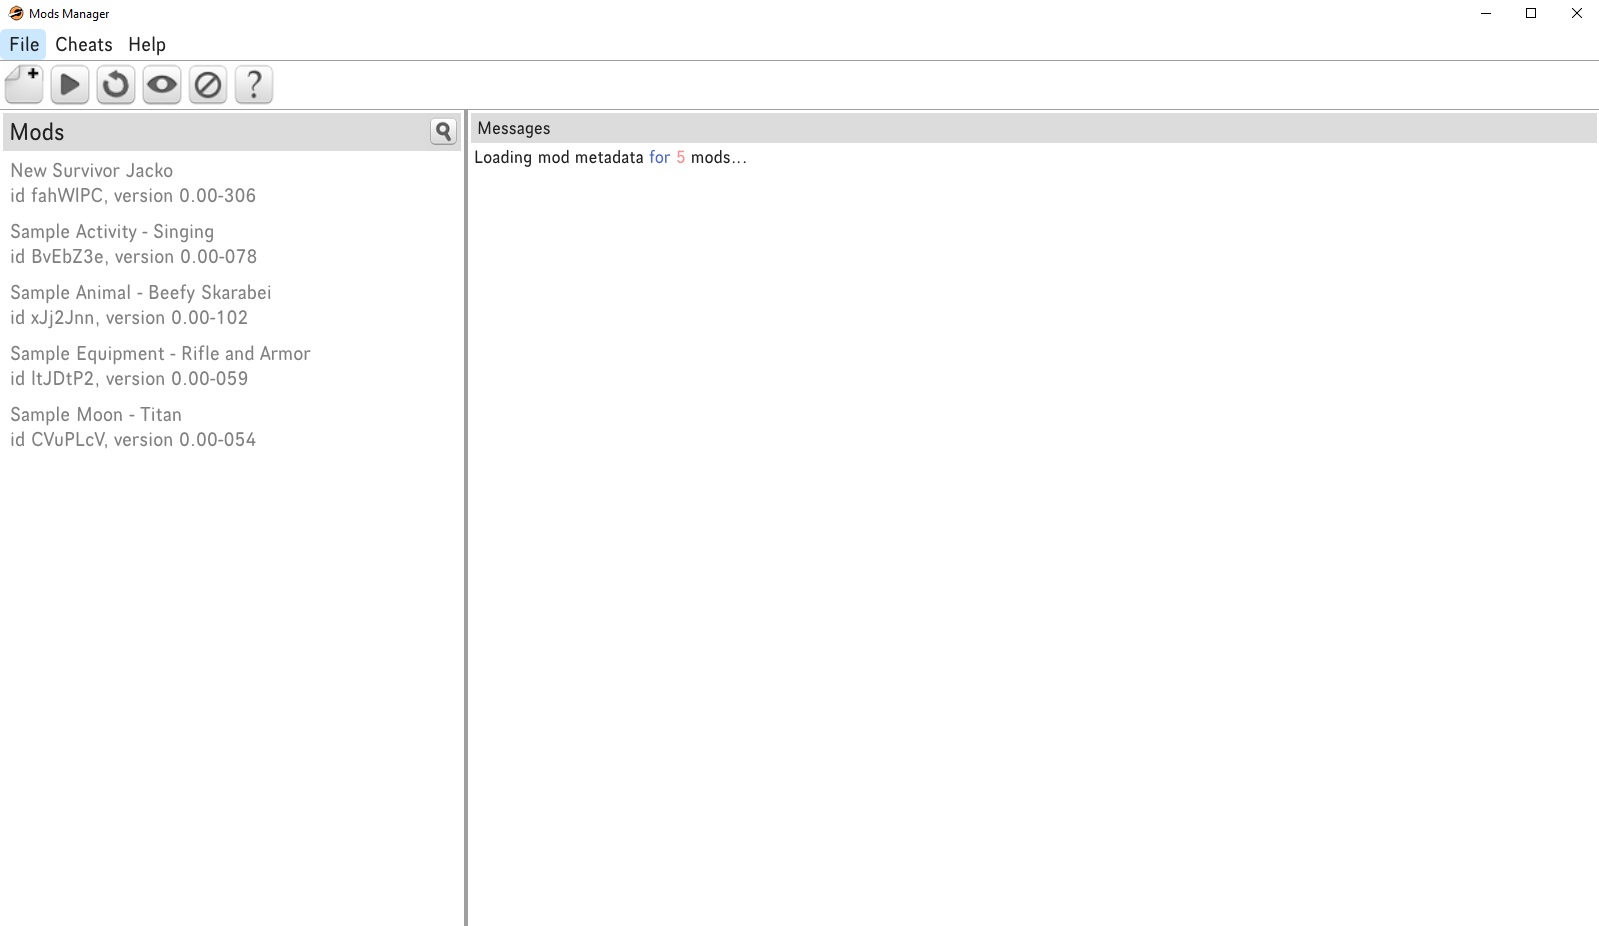
The *Mod Editor* has two windows. One lists all mods in the left column, and displays any diagnostic messages produced by the tools in the wider right column.
Please check the information in the **"Messages"** section to make sure the mods are working as expected. This window will also inform you if some mods are ignored due to newer versions and if there are any errors with the loading of the mods initially or during runtime:
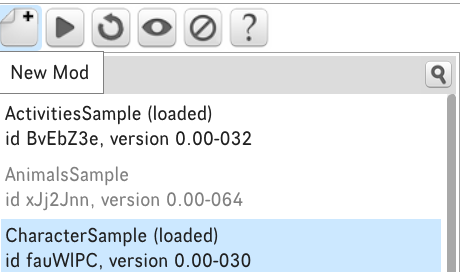
Double-click on a specific mod to modify it or click on "New Mod" button from the top menu to create a mod. This will open the *Mod editor*.
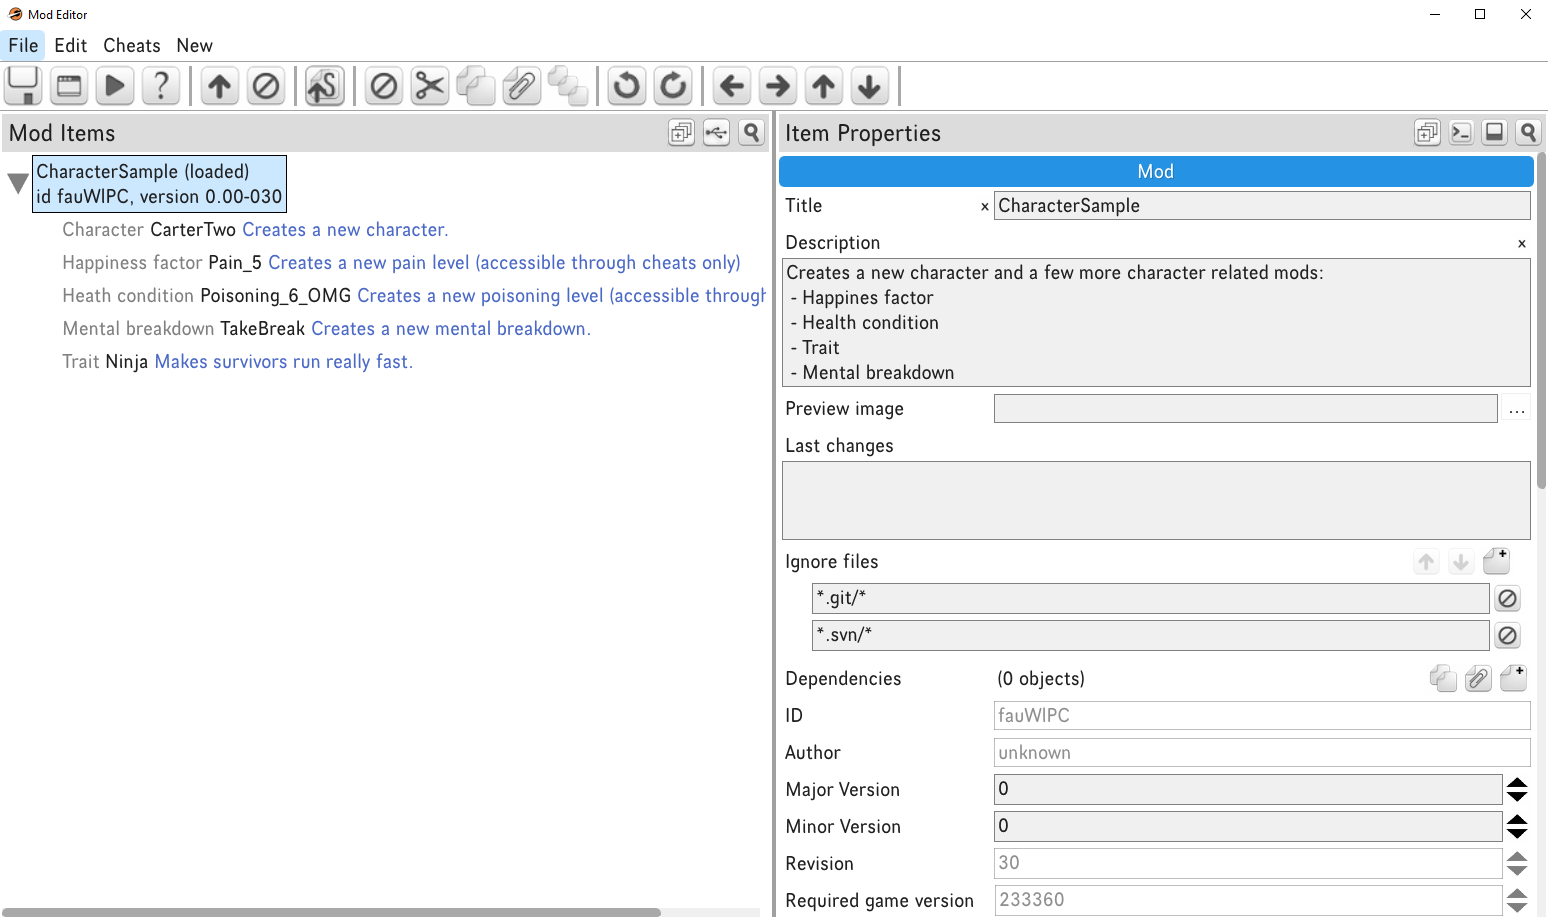
The Mod Editor window lists all mod items in a tree view in the left column, and their properties in the right column. From the menu you can add new ModItem items, test the mod, or upload it to Steam Workshop.
!!! Tip
You can copy a mod item from one mod and paste it into another.
When entering the *Mod Editor* from the main menu, the game will load a special map for testing out your mod.
The *Mod editor* will also give you access to specic developer functionlities such as cheats that give you any item or increase your damage to help you test the mods.
!!! Tip
The "Test" button is relative to the selected mod item.
For example - When Entity mod item is selected, it will place the imported entity for you to check if the import wortked properly. In other cases - it will apply the changes you've made to the mod map. For example, when creating a new inventory item, you can place it the inventory of the selected unit with the test button.
# Where to start?
## Presets
The game uses a lot of structured data called *Presets*. Each *Preset* of a given type is part of a *Group* and has a unique *Id*.
There are many *ModItems* that allow adding *Presets* that will be used automatically by the game.
For example, adding a new Unit preset, it will appear in the hiring screen depending on the defined hiring rank.
!!! Tip
If a *ModItem* adds a *Preset* with the same **Id** as an existing *Preset* of that type it will **replace** the existing *Preset*. For example, creating a new *Unit* with **Id** *Ivan* will replace the definition of *Ivan* that the game already has.
Some *ModItems* will not have an effect until referenced by another *Preset*.
For example, a *ModItem* *Inventory Item* that adds a new item needs to be referenced by a custom code that spawns it or a loot table that includes it.
## Learning more
There are many different *ModItems* and they have many properties that can be helpful in one situation or another. How to find out which one to use?
It's a good idea to see how existing *Presets* are setup. When a *Mod Item* has a **Copy from group** and **Copy from** properties, you can select a **Group** and then an **Id** of an existing *Preset* and your *ModItem* will get a copy of all the properties of that *Preset*.
!!! WARNING
When you select anything in the **Copy from** field the properties of your *ModItem* will be overwritten! Make sure you do not lose any information that way.
Another option is to see the example mods included in the *\Steam\steamapps\common\Jagged Alliance 3\ModTools\Samples\Mods\* folder or how other mods on *Steam Workshop* function by *subscribing* to them and then opening them in the *Mod Editor*.
# Mod Items
Here are the supported *ModItem* types:
## ActionFX
ActionFX mod items define visual and sound effects.
[ActionFX](ActionFX.md.html)
: Base class of all FX actions mod items.
[ActionFXSound](ModItemActionFXSound.md.html)
: Plays sound effects when an FX action is triggered.
[ActionFXDecal](ModItemActionFXDecal.md.html)
: Places a decal when an FX action is triggered.
[ActionFXObject](ModItemActionFXObject.md.html)
: Places an object when an FX action is triggered.
[ActionFXLight](ModItemActionFXLight.md.html)
: Places light sources when an FX action is triggered.
[ActionFXParticles](ModItemActionFXParticles.md.html)
: Places particle systems when an FX action is played.
ActionFXRemove
: Removes an action fx.
## Assets
[Code](ModItemCode.md.html)
: Does almost anything - but make sure you read the Scripting in Lua section first!
[Entity](ModItemEntity.md.html)
: Import art assets from Blender.
[Localization Table](ModItemLocTable.md.html)
: Add translation tables to localize the game in other languages.
Decal
: Define decal, which can be placed via the ActionFXDecal mod item.
[Font](ModItemFont.md.html)
: Import new font files and define which in-game fonts should be replaced by them.
[Convert & Import Assets](ConvertAndImportAssets.md.html)
: As the name suggests, it allows for a number of asset types to be converted so that the engine could use them and import them in the mod folder.
## Buildings
Floor material
: Creates a custom flooring material and defines it's properties - color, required resources, integrity, etc.
Roof/Slab/Stairs material
: Creates a custom material and defines it's properties - color, required resources, integrity, etc.
## Gameplay
Gameplay mod items define additional gameplay elements - some of them (Game difficulty, Game rule) are directly visible in the game, others (Loot definition, Loot definition change, Popup notification) need to have defined triggers, or spawn definitions, or other triggers, to be visible in the game.
Change Property
: Allows to change a specific property of an existing preset. It has 3 ways of changing the given property: Replace, Append to Table and Code.
Constant
: Allows modifying the global constants used by the game.
Game difficulty
: Creates a custom game difficulty and set custom effects on the loaded map.
Game rule
: Defines a new game rule that can be activated by players when starting a new game.
Popup Notification
: Allows adding new presets with tile, text and image that are used mainly in tutorials and starting help.
Quest
: Allows adding new quests along with setting up variables connected to them. Each quest can be set up with conditions for giving, failing or completing it.
Loot Definition
: Creates a new loot defination that contains possible items to drop. Note: The unit preset has a reference to a loot defination which will be used as starting items.
## Mod Options
Allows adding easily modifiable options to your mod. The options of the mod could be found in the *CurrentModOptions* or in the *AccountStorage.ModOptions.[mod_id]*. Also, the Message *ApplyModOptions* could be used to apply changes in the mod behvaior instantly. When an option is added to a mod, the user will be able to change it from the Main Menu -> Options -> Mod Options.
Choice
: Creates a ui entry with a dropdown that contains all listed options.
Number
: Creates a ui entry with a slider.
Toggle
: Creates a ui entry which when pressed toggles between the 2 defined values.
## Item
Calliber
: Defines a new caliber type that an inventory item of type Ammo could use.
Combine Recipe
: Defines a new recipe with ingredients and result items that can be performed in the inventory.
Inventory Item
: Creates a new inventory item preset.
Weapon Slot
: Creates a new possible weapon slot that could defined for a weapon preset and referenced in a *Weapon Component* preset.
Weapon Component
: Creates a new weapon component that could be used in a weapon as a base component or through the *Modify* ui screen of a weapon.
## Satellite
Crafting Operation Recipe
: Creates a new Crafting Operation Recipe that is accessed through the sector operations menu.
Sector Operation
: Creates a new sector operation that could be accessed through the sector operation menu.Allows adding new quests along with setting up variables connected to them. Each quest can be set up with conditions for giving, failing or completing it.
## Unit
Appearance Preset
: Creates a appearance preset that is used by a unit preset.
Banter
: Creates a new banter preset that is played between a defined set of actors.
Character Effect
: Creates a new character effect preset that could be added/removed from a unit.
Squad Name
: Defines a new squad name.
Translated Voices
: Allows for adding new voices for a given language or replaces existing ones. For more info check the explanation in the mod item itself.
Unit
: Creates a new unit preset.
Unit Voice Responses
: Creates a new voice responses preset that contains all texts related to an id of *Unit* preset.
Voice Response Type
: Creates a new voice response type that could be defined for a *Unit Voice Responses* preset.
## Other
Lightmodel
: Define a set of lighting parameters controlling the look of the day/night cycle.
Message Definition
: Reffer to [Messages](LuaMessages.md.html) and [Reactions](LuaReactions.md.html) for more info.
Particle system
: Creates a new particle system and defines its parameters.
Radio station
: Adds a custom radio station, allowing to select folders with tracks to be implemented in the game instead of the soundtrack.
XTemplate
: Adds a new user interface panel that can contain certain information.
[Sound](ModItemSound.md.html)
: Define sound presets, which can be played via the ActionFXSound mod item.
TextStyle
: Adds a new text style that can be used by XFontControl and other classes in XTemplate presets.
Mod Metadata
============
Mod metadata is the information used for displaying and loading the Mod.
It contains the mod id, title, description, preview image, version and more.
Mods can depend on each other and this is also listed in the metadata.
Adding dependencies between mods ensures proper loading order - every dependency mod will be loaded before the dependant one.
It will also inform the user if there are issues like missing mods or incompatibilities.
Since mods change over time, their versions also change. Each mod has three fields to describe their version: `Major version`, `Minor version` and `Revision`.
When displaying those, they are formated in the following fashion: `major.minor-revision`.
For example `1.3-12` means: major version 1, minor version 3 and revision 12.
The major and minor version is managed by the modder, while the revision will be automatically updated every time the mod metadata is saved.
These versions can be used by mod dependencies.
To add a mod dependency, locate the "Dependencies" property in the Mod Editor and click the "Create Item" button on the right.
A new dependency item will be added and four fields will be available:
- Mod - a drop down with all installed mods listed in the format `Title - ID - version`. It is allowed to manually write the ID of a dependency that you do not have installed, but strongly discouraged. Note: selecting a mod from the drop down will overwrite the version fields automatically.
- Major version - the minimum compatible major version of the dependency.
- Minor version - the minimum compatible minor version of the dependency. Note: dependencies cannot depend on revision.
- Required - a dependency could be marked optional if it is not vital to the functioning of your mod. By default all dependencies are required.
Scripting in Lua
===============
*Jagged Alliance 3* is created usign the [Lua 5.3](http://www.lua.org/manual/5.3/) programming language, and mods can add Lua code to replace, modify or extend parts of the game.
[Lua Basics](LuaBasics.md.html)
: This section documents some of the basic concepts and the systems built on top of Lua.
[Game/map variables](LuaVars.md.html)
: Declare global game/map variables
[Classes](LuaClasses.md.html)
: Lua doesn't come with a built-in class system, only with tools for creating one. Here is how our works.
[Threads](LuaThreads.md.html)
: Cooperative threads are built on top of Lua coroutines and allow for natural expression of game logic.
[Repeats](LuaRepeats.md.html)
: Periodically repeating functions
[Messages](LuaMessages.md.html)
: Messages are a mechanism for hooking functionality to specific events in the game code, and for synchronizing Lua threads.
[Reactions](LuaReactions.md.html)
: Reactions are a data driven way of hooking functionality to specific events in the game code.
[CObjects](LuaCObject.md.html)
: This is what the C++ rendering engine knows about the world of the game: objects' position, appearence, animations, etc.
[Map Enumeration](LuaMapEnumeration.md.html)
: This is how Lua code can efficiently query the C++ side about what's where in the world.
[Savegames](LuaSavegame.md.html)
: Savegames work by serializing the entire state of the game world, and work mostly automatically.
[Startup](LuaStartup.md.html)
: Description of Lua loading procedure - setting up the Lua environment and loading all available code.
[Pathfinding](Pathfinding.md.html)
: Information about the pathfinding algorithm.
[User Interface](LuaUI.md.html)
: Information about the functionality of user interface.
Lua Reference
-------------
The following documents describe some of the functions available in Lua, organized by area:
[Terrain](LuaDoc_terrain.md.html)
: The functions available in Lua concerning the terrain in the game.
[CObject functions](LuaDoc_CObject.md.html)
: Functions for manipulating [CObjects](LuaCObject.md.html).
[*point* and *box* functions](LuaDoc_point.md.html)
: The *point* and *box* are custom userdata types hold 2D/3D coordinates and 2D/3D ranges and are used for positions, areas, etc. Besides the expected overridden operators, these functions can be used to manipulate them.
[Global Lua functions](LuaDoc__G.md.html)
: These are functions that don't fall in any of the other categories.
[Selection functions](LuaDoc_Selection.md.html)
: Functions for working with cursor position and selection.
[Camera functions](LuaDoc_camera.md.html)
: Functions for working with the camera. The [fly camera](LuaDoc_cameraFly.md.html), [max camera](LuaDoc_cameraMax.md.html) and [RTS camera](LuaDoc_cameraRTS.md.html) could also be separately modified.
[Messages](LuaDoc_Msg.md.html)
: Functions for working with messages. They are used to affect the game at certain important points, such as the begining of a new day, death of a colonist, etc.
# Sample Mods
Four sample mods are provided for demonstration and starting point. You can find the sample mods in ModTools folder and some of them in the Steam workshop. Additional modding tools and a sample Blender scene are provided in the Steam folder ...\Steam\steamapps\common\Jagged Alliance 3.
: Convert&Import assets
Before you start working on your mods, we suggest orginizing dedicated source folder which can include subfolders for sounds, images, textures and so on. With the Convert&Import assets mod item, you can easily import the source files in the most convient file formats for the game and place them automatically in the mod folder and import them.
## New Merc - Sabrina Drake
This sample mod illustrate how to create a custom merc that can be hired from A.I.M., using already existing assests from the game. In the mod is displayed how to import sound files and images for the merc and add voice overs and translations of the custom merc lines in 2 languages.
The mod was created with the following mod items:
Unit
: This mod item can be used for creating all types on units in game - enemies, NPCs, mercs and others. It is used for binding other mod items to the custom unit - such as appearance, voices, equipment and so on.
- When creating a merc, use Class UnitData and Group MercenariesOld/MercenariesNew. Placing it in the Mercenaries group will allow you to add Hiring conditions, lines, etc.
- In the Unit mod item you can place name, details, bio and perks for your merc and add the portrait (300x300px) and full size image (2000x2000px).
Appearance preset
: With this mod item you can change or create new appearances for units based on selecting assets for the different parts of the body. The sample mod uses the top of Fox character - it's placed in the Body section. Some assets in the game support colorization, and some don't. Merc costume parts cannot be colorized and will not be changed even if you add colorization. Selecting different parts from the dropdown section will not immediately change the appearance of the unit in-game. To see the applied changes, you need to link the appearance to the Unit you've just created. Save the preset and give it an ID. Go back to the Unit mod item, open the appeance section and select the Preset with the given ID. Press the "Test" button from the main menu to see all changes you apply to the appearance.
Unit Voice responces
: This mod item allows you to add custom lines to the character for all events, states, combat actions in the game. Filling in the texts here is the first step for creating voiced lines for you merc.
- This section, along with the lines that appear in the Hiring settings in the Unit mod item, can be translated. If you plan to translate your merc, fill in as much displayed texts as possible before start of translation.
Export Translation Table
: Translation tables are used in the game for 2 cases - translations, and linking texts and voiced lines via the same ID. In the Sample mod, we are going to use them for both.
- In order to add translated voices to your mod, you will need to generate IDs for the texts in your mod. Open the file section and select Export Translation Table option. Open the mod folder and check the generated ModTexts.csv file - it should contain all displayed texts and lines of your character.
Localization
: The mod item will allow you to select the language for the tranlation for the desired language, and import a csv file with the translated strings. A copy of the file ModTexts.csv is used for the translation to a single language, in this case - German. When the file is includes the translations, it is ready for import.
- Using this mod item you can also add translations for the entire game - in the instalation folder of the game/ModTools you'll find game.csv file with the entire list of strings in the game.
Prepare sound files for import
: As mentioned above, the voice overs and texts are connected via the String ID - this means we need the voiced lines to have the same file names as the strings of the texts in the game.
- The sounds that can be imported as voices should be with the following specs: Sample rate: 48 000, Bits/sample 24, format .wav, Mono
- Two folders are prepared for the mod - German and English - Folders include voice over sounds, with all files renamed to match the ID of the texts.
- The Convert&Import assets is used to the source .wav files for converting them to .opus. The same file structure is kept in the source folder and the mod folder.
Translated voices
: This mod item tells the mod in which folder to look for the voice over files. We need 2 mod items - for English and for German. Mount the folders.
## New Weapon - Thompson
This sample mod creates a new weapon with imported asset for the gun and the magazine, along with custom ammo. The mod modifies existing loot definition and creates a new one, adds sound and particle effects to the gun.
You can review the blender scene that is used for the gun in Steam folder \steamapps\common\Jagged Alliance 3\ModTools\Samples\Assets\M1A1_Thompson. It is important to match the scene to the assets in the game as close as possible and more precicely - the spots - in this case - for the hands and for modifications. After you have finished setting up your scene, you can export it. The exported files are in the \AppData\Roaming\Jagged Alliance 3\ExportedEntities folder.
For more details on the scene structure and exporting - check the Entity section.
Entity
: This mod item allows you to import and load custom geometry and textures into the game. Locate the .ent files from you ExportedEntities folder, import them and save. When a new asset is added or changed, you can apply the changes in the game bu pressing the "Reload entities" button.
Once the asset is imported, you can press the "Test" button to see if the entity is placed properly on the map. White cube will be placed if the scene is not structured properly.
- In this case, we need two Entity mod items for 2 entities - one for the gun, and one for the magazine.
Inventory Item
: Inventory item mod item is used to create the deffinition of the new gun in the game and link it to the asset. The Id of this mod item is important and will be used when defining the FXs and modifications. The class should match the weapon type.
- In this mod item you'll be able to set the display name, available attacks, the used callibe, damage, available modifications, action points when used in combat and other weapon properties.
Weapon Component
: This mod item defines the entity used for a weapon modification, the spot it needs to be attached to, the weapons it's applicable to and other gameplay properties such as repair costs. The improrted entity for the magazine is placed in the visuals propert under Enitity.
Caliber
: This mod item creates a definition for a custom caliber for the weapon and sets it's ID which is refferenced in the weapon.
Inventory Item
: Inventory item mod is needed for the ammo and the custom caliber, so it can be referenced in loot tables. Then the group is set to Ammo, you'll be able to add modifications, applied effects and also link the caliber that is created.
Crafting operation recipe
: The Crafting operation recipe mod item is used to define a new recipe for crafting the ammo and the required ingredients.
Loot definition
: The Loot definition mod item is used to modify the existing in-game loot tables to include the new weapon. You can replace an existing definition in the game by using the same ID. A new loot definion including the new gun can be used for a starting loof of unit.
Sound
: The Sound mod item allows you to add sound files in the .opus file format. You can use the Convert & Import Assets mod item to add the sounds to a dedicated sound folder for the mod. The sound type property in the mod item will also specify the sound file specs that are needed for the group. For example - most sounds in the game are mono. But ambient sounds and Music sound types will allow you to add stereo sound files.
Action FX Sound
: The Action FX Sound mod item will link the sounds via the ID of the sound item to a specific moment, action, actor or target.
Particle system
: Particle system mod item adds a custom particle and sets it's properties in the game.
Action Fx Particles
: Similar to the mentioned above sounds, the Action FX Particles links the Particle system to a specific moment, action, actor or target.
## New Imp Merc
This sample mod illustrates how to add imported blender scenes as Male costume parts that can be mixed and matched with the parts that already exist in the game. The essential part of this mod is the blender scene itself since it has a reference - skinned body mesh that is structured in a way that will allow the game to recognize the bones and inherit the right animations. Note that different skeleton are used for male and female animations and the entities for female and male clothes inherit them, so mixing female and male parts will result in broken units.
You can review the blender scene that is used for the mod in Steam folder \steamapps\common\Jagged Alliance 3\ModTools\Samples\Assets\Smart_suit.
Unit
: This mod item is used to create the I.M.P. merc. The Group should be set to IMP and this way the game will place your merc in the selection screen with the other IMP characters.
Appearance preset
: The Appearance preset is used to bind the entities that are added as clothes to the appearance of the IMP merc. The important thing to note is that each part of the clothing has a specific class. When your entity is importd in the game, you should set it to the correct class so it's recognized by the editor.
Entity
: The Entity mod item is created to import the bottom part of the costume - the pants. After the entity is improtedm the class should be set to CharacterPantsMale. This way the entity will appear in the Appearance preset dropdown for pants and bottoms.
Entity
: The Entity mod item is created to import the top part of the costume - the suit. After the entity is improted, the class should be set to CharacterBodyMale. This way the entity will appear in the Appearance preset dropdown for body parts - where the tops are.
Code
: The Code mod item is created to add a new CosmeticArmor class. This class is used to define items that will change the appearance of the merc when equipped. The backbone of the code is the "OnUpdateItemsVisuals" message that is send when items on a unit a updated.
Inventory items
: The inventory mod items are created to showcase how to reference the new cosmetic class and fill its properties to correctly update the appearance of the unit that uses these items.
## New Operation Scrounge Sector
This sample mod illustrates the creation of a new sector operation. The operation will be active in all sectors. Its duration time depends of the assigned mercs' Wisdom.
Operation definition
: The metod 'ProgressPerTick' is called once on each Satellite View tick that is once on each 15 'game minutes'. The 'Complete' method is called when the operation progress reaches the operation threshold. In each sector there is a member 'custom_operations', a table that can be used to save the progress. It is saved in the savegame and can be used to store other useful data during the operation. In original variant it is used for creation of a simple, similar operations with progress, required stat and fixed time (progress and threshold to complete), in which cases the the Custom flag is set. But here it is used just to save the progress in sector/savegame, so some metods such as ModifyProgress are changed and the check for 'Custom' flag is removed. If you want to change/ overwrite some other methods make shure the meessages are called - Msg("OperationCompleted", SectorOperations[operation_id], mercs, sector). They are used to complete the oeration, free/sync mercs, update the timeline and mercs UI and other.
Loot table
: On complition of that sample operation the user gets items generated from two loot tables.'ScourgeOperationUrbanLoot' - if the sector is with city, mine, guard post, hospital or repair shop or 'ScroungeOperationWildernessLoot' in other case.
UI dialog
: 'SectorOperation_ScroungeLootUI" is a dialog with a list with generated items shown to the player.Generated items, assigned mercs the sector are passed to the dialog through its context.
# Sample Mod Assets
A few sample Blender scenes are provided to demonstrate how to structure a scene in \Steam\steamapps\common\Jagged Alliance 3\ModTools\Samples\Assets\.
They are ready for export and can be used as a starting point for [Entity mod item](ModItemEntity.md.html).
(insert footer.md.html here)